

Table of contents
- Objectives
- Overview
- Prerequisites
- Synchronous vs Asynchronous tasks
- What is Redis?
- Advantages of using Redis
- Building an Order management API in Django rest framework
- Celery and its configuration for Django
- Creating a Redis instance and connecting to it
- Deploying API in Heroku
- Testing the API in production
- Conclusion
- Reference
Objectives
- Build an Order service with Django
- Introduce Redis and its benefits
- Successfully Set up a Redis instance in the Redis lab
- Connect celery and Redis and run background tasks successfully
- Deploy the API to Heroku and run it successfully in production
Overview
Supposed you have a long-running task in your application or a recurring one; it can be sending emails or receiving events from a webhook. How do you handle them?
Asynchronous tasks in the Django rest framework are delivered using a task queue like Celery that stores messages in a message broker like Redis and distributes them to their destination in an application.
In this article, I will introduce Redis and its benefits, design an order management API, and perform background tasks using Celery as the task queue and Redis as the storage broker.
Prerequisites
- A good understanding of Python
- Knowledge of Django and Django Rest Framework
- Testing APIs in Postman
- Knowledge of Git and Github
Synchronous vs Asynchronous tasks
In applications, tasks are performed synchronously, asynchronously, or both.
Synchronous tasks are tasks that are performed one at a time i.e a task is waited to be executed before performing another.
A major example is the REST protocol which uses the request-response cycle where a client sends a request and awaits a response.
Unlike synchronous tasks, asynchronous tasks don’t occur in real-time that is the request and response occur independently from each other. When a client sends a request, the request is queued and a middleman called message broker stores it and executes it in the background
In Django applications, Celery is used as a task queue and Redis as a message broker to run asynchronous tasks.
The two processes have advantages over each other and are mostly used in applications to ensure faster response time and eliminate lagging of the application.
What is Redis?
Redis, also known as Remote Dictionary Server, is an in-memory data store widely used as a key-value database (NoSql), a cache and session storage, real-time message broker, and queue. Redis is an open-source project that is used by millions of developers worldwide and top tech companies as it is relatively fast and provides support for various data structures like lists, strings, sets, hashes, JSON, bitmap, etc
Advantages of using Redis
- It is highly available and scalable and used in large enterprises like Amazon, Github, etc.
- It is an open-source project with a vibrant community and is supported by various languages like Python, Ruby, Javascript, C++, Golang, etc.
- It is relatively fast and can process a large amount of data in a few seconds
- It is very simple to set up and use
Now, let's get to using Redis by building an API.
Building an Order management API in Django rest framework
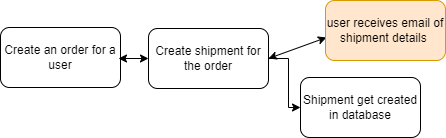
We will build an API to manage orders and shipments using Django and Django rest framework.
Our goal is to be able to create an order and shipment for a customer and send the customer an email with the shipment details asynchronously by running it as a background task.
The workflow looks like this :
Setting up our Project environment
To get started, we will be setting up our project environment, installing the necessary dependencies, and creating a new Django project.
Create a new folder for your project
Activate a virtual environment and install Django and djangorestframework
$ pipenv shell

$ pipenv install django

$ pipenv install djangorestframework
Create a new Django project, go to the directory of the project and create a new app
$ django-admin startproject orderSystem

$ cd orderSystem

$ python manage.py startapp orderApp
Add the new app and rest_framework to installed apps in settings.py and create a urls.py file for the app
INSTALLED_APPS = [
    "django.contrib.admin",
    "django.contrib.auth",
    "django.contrib.contenttypes",
    "django.contrib.sessions",
    "django.contrib.messages",
    "django.contrib.staticfiles",

    "orderApp",
    "rest_framework",
]
Your folder structure should look like the image below
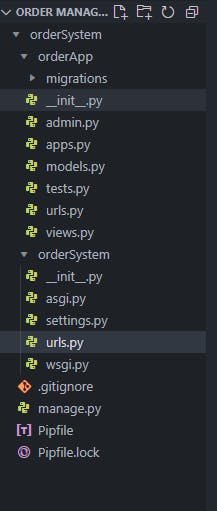
Include the app urls.py file in the project urls.py
from django.contrib import admin
from django.urls import path, include

urlpatterns = [
    path("admin/", admin.site.urls),
    path("", include("orderApp.urls"))
    ]
create an empty urlpattern in the app urls.py file
from django.urls import path

urlpatterns = [
]
Creating models
In models.py file, create an Order and Shipment model
import uuid

from django.db import models
from django.utils import timezone


class Order(models.Model):
    name = models.CharField(max_length=250)
    quantity = models.IntegerField()
    price = models.DecimalField(max_digits=200, decimal_places=2)
    weight = models.DecimalField(max_digits=200, decimal_places=2)
    created_at = models.DateTimeField(default=timezone.now)


class Shipment(models.Model):
    STATUS = (
        ("pending", "pending"),
        ("shipped", "shipped"),
    )

    id_reference = models.UUIDField(default=uuid.uuid4)
    order = models.OneToOneField(Order, on_delete=models.CASCADE)
    address = models.CharField(max_length=250)
    owner_name = models.CharField(max_length=250)
    owner_email = models.EmailField(max_length=250)
    shipment_date = models.DateTimeField(default=timezone.now)
    status = models.CharField(max_length=200, choices=STATUS, default="pending")
The Order model contains the details of the order to be shipped while the Shipment model contains the details of the order shipment which are going to be stored in the database. The two models are related to each other in a One-to-One type of relationship.
After creating the models, migrate them to the database by running the two commands below in the terminal.
$ python manage.py makemigrations

$ python manage.py migrate
Creating Serializers
In the Django rest framework, serializers help in converting objects into data types that are understandable by the client.
We will be creating a new file called serializers.py in the app directory to create serializers for our models.
from rest_framework import serializers

from .models import Order, Shipment

class OrderSerializer(serializers.ModelSerializer):
    class Meta:
        model = Order
        fields = ["id", "name", "quantity", "weight", "price", "created_at"]

class ShipmentSerializer(serializers.ModelSerializer):
    order = OrderSerializer(read_only=True)
    order_id = serializers.IntegerField()

    class Meta:
        model = Shipment
        fields = [
            "id_reference",
            "order",
            "order_id",
            "address",
            "owner_name",
            "owner_email",
            "shipment_date",
            "status",
        ]
    def create(self, validated_data):
        try:
            order = Order.objects.get(id=validated_data["order_id"])
            shipment = Shipment.objects.create(order=order, **validated_data)

            return shipment
        except Order.DoesNotExist:
            return serializers.ValidationError("This order doesn't exist")
I created a serializer for the Order and Shipment model. The order serializer was nested in the Shipment serializer because I will return the order details together with the shipment details.
I also validated the order_id to return a proper error message when creating a shipment for an order that doesn’t exist.
Creating Views and Routes
The next step after creating the serializer is to create views for the client to connect with.
In the views.py file, add the following codes
from rest_framework.generics import CreateAPIView

from .models import Order, Shipment
from .serializers import OrderSerializer, ShipmentSerializer


class CreateOrder(CreateAPIView):

    serializer_class = OrderSerializer
    queryset = Order.objects.all()


class CreateShipment(CreateAPIView):

    serializer_class = ShipmentSerializer
    queryset = Shipment.objects.all()
Here, I created two generic views to create new Orders and Shipments in the database.
Then, I will create the route for each view in the urls.py file
from django.urls import path

from .views import CreateOrder, CreateShipment

urlpatterns = [
    path("orders", CreateOrder.as_view()),
    path("shipments", CreateShipment.as_view()),
]
Now, that we have our basic URLs set up to run our synchronous tasks, let’s configure Celery to send shipment emails after creating a new shipment.
Celery and its configuration for Django
After creating a new shipment, I want to send an email to the owner to notify them that their order shipment is on its way, I don’t want to handle this in a synchronous way but as a background task.
Celery is a task queue used to implement asynchronous work like scheduling, monitoring events, etc outside the request-response cycle. For celery to work efficiently, it needs a separate service called message broker to send and receive messages. Redis is mostly used with celery due to its speed.
To get started with celery in Django, we will install celery and Redis by running the following commands in the terminal:
$ pipenv install celery

$ pipenv install redis
In the project/project directory, create a new file called celery.py file and add the following codes to configure celery
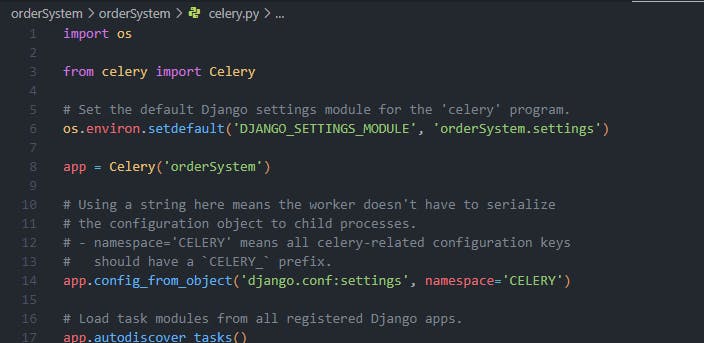
In project/project/_init_.py file, import the celery_app to ensure it is loaded when Django starts

In the project settings.py add the following codes
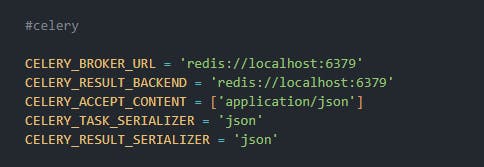
Here, I am connecting to the local Redis as my broker which will be changed after creating a Redis instance on Redis Cloud.
After, I will create my background task which is sending an email to the owner of the order.
Create a new file called tasks.py in the app directory and add the following codes
from celery import shared_task

from django.core.mail import EmailMessage


@shared_task
def send_shipment_email(owner_name, order_name, owner_email):
    mail_subject = "Your order is ready"
    message = "Hello {0}, your order {1} is ready to be shipped\n Kindly have patience.\n regards.".format(
        owner_name, order_name
    )
    email = EmailMessage(mail_subject, message, to=[owner_email])
    email.send()
To ensure the email gets sent, I will need to add my email settings in settings.py

I added my google email and password in my environment variables.
Note: Google most times blocks SMTP connection so it is advisable to create an app password from a google account and use it in the app.
In the view.py file, I will rewrite my Create Shipment view to call the task function
from rest_framework.generics import CreateAPIView
from rest_framework.response import Response
from rest_framework import status

from .models import Order, Shipment
from .serializers import OrderSerializer, ShipmentSerializer
from .tasks import send_shipment_email


class CreateOrder(CreateAPIView):

    serializer_class = OrderSerializer
    queryset = Order.objects.all()


class CreateShipment(CreateAPIView):

    serializer_class = ShipmentSerializer
    queryset = Shipment.objects.all()

    def post(self, request):
        serializer = self.serializer_class(
            data=request.data,
        )
        serializer.is_valid(raise_exception=True)
        serializer.save()
        owner_name = serializer.data["owner_name"]
        order_name = serializer.data["order"]["name"]
        owner_email = serializer.data["owner_email"]
        send_shipment_email.delay(owner_name, order_name, owner_email)
        return Response(serializer.data, status=status.HTTP_201_CREATED)
Now, let’s create a Redis instance on the Redis Cloud and connect to it.
Creating a Redis instance and connecting to it
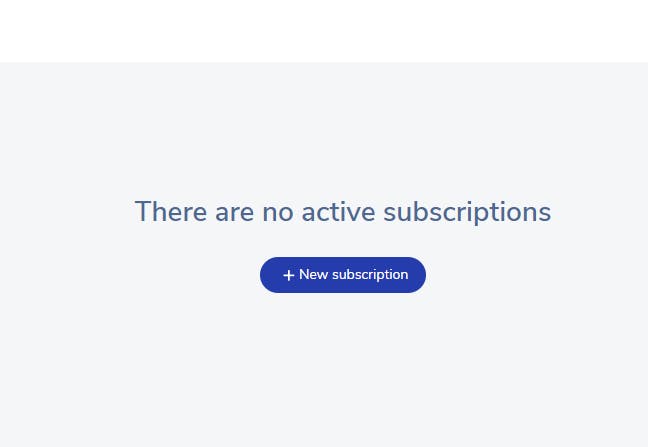
To create a Redis instance we can connect to locally and in production, I will be creating an account on Redis.
After creating an account, you will be directed to a dashboard to create a new subscription
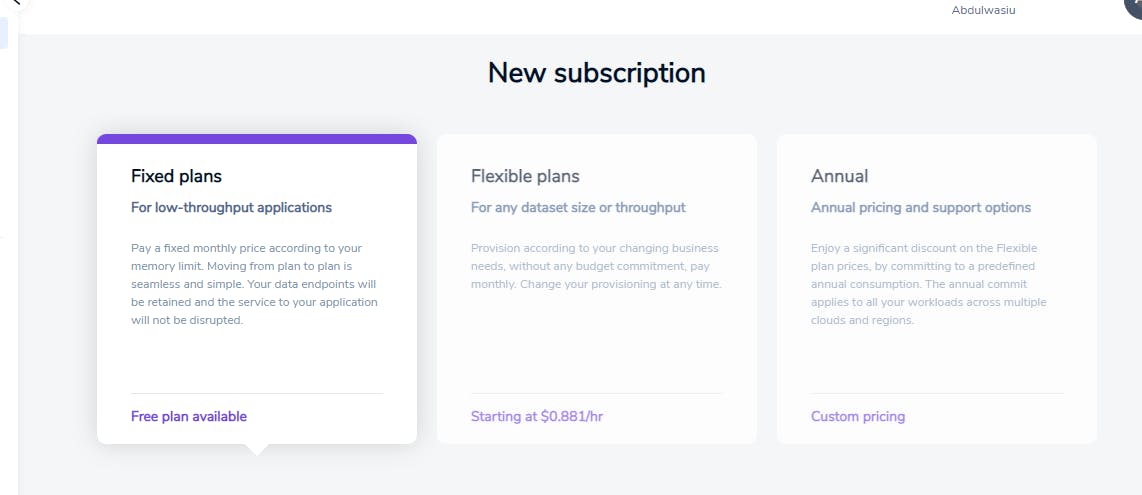
Click to create a new subscription and choose your subscription type, I will be going with the free plan for practice.
After that, create a new database instance in your subscription tab
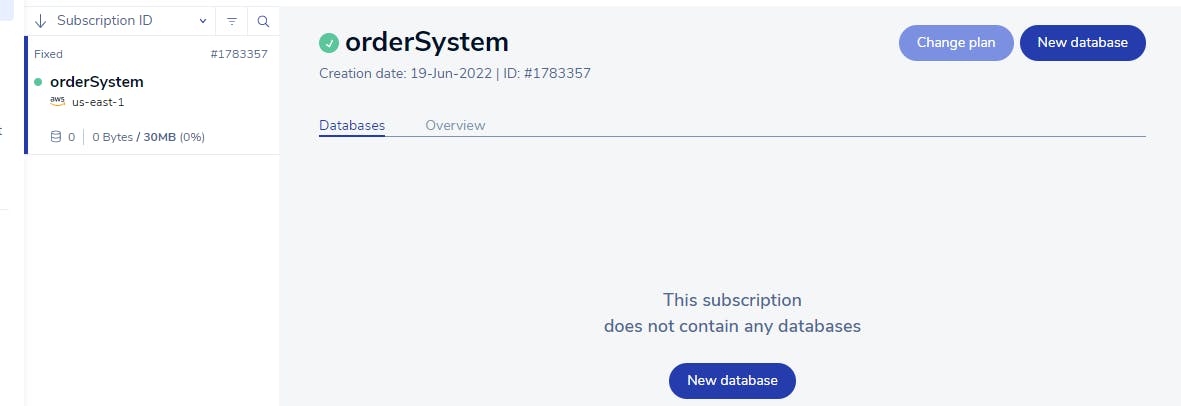
Configure your database and activate it
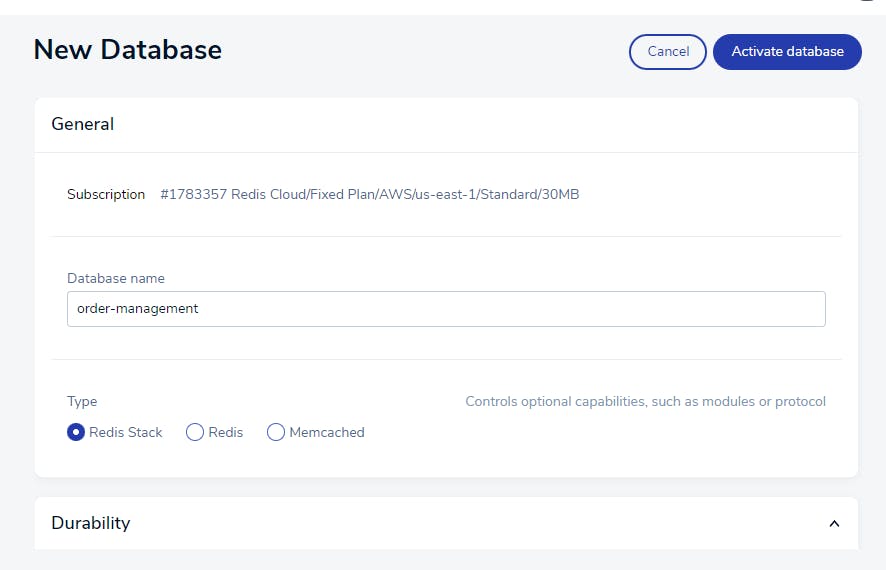
You can choose either Redis or Redis Stack but Redis Stack is preferable because it is an extension of Redis with more features for a complete developer experience.
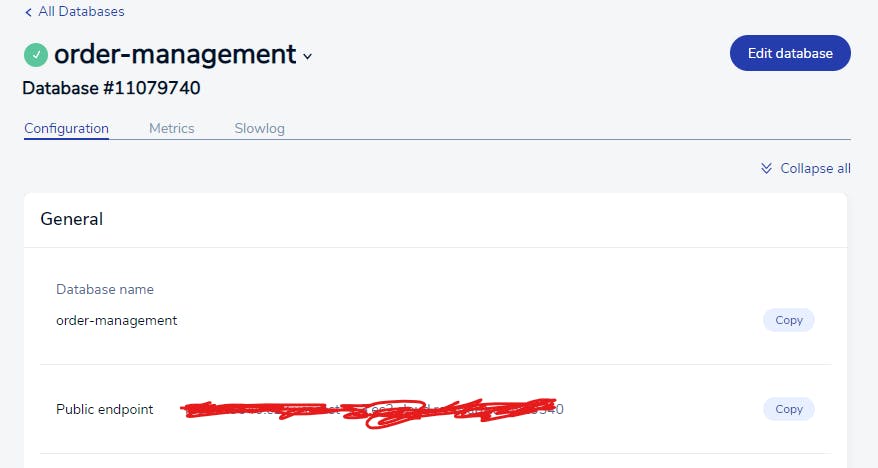
Once the database is activated, you will be given a public endpoint and a password, this is what we are going to be using to connect to the Redis instance from our Django application.
In your environment variables, store your Redis URL in the format below
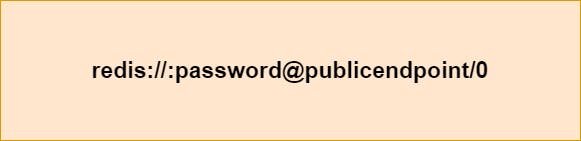
Change your broker URL in your celery configurations to the Redis URL

Now, we have successfully connected to our Redis instance.
Let’s deploy into production.
Deploying API in Heroku
To deploy our API, we will need to create an account on the Heroku platform.
After creating an account, Install the Heroku CLI.
From the VS Code terminal, log in to your Heroku account by running $ heroku login -i and create a new app.

Note: Heroku uses unique names for apps, so you can name your app any name that doesn’t exist before.
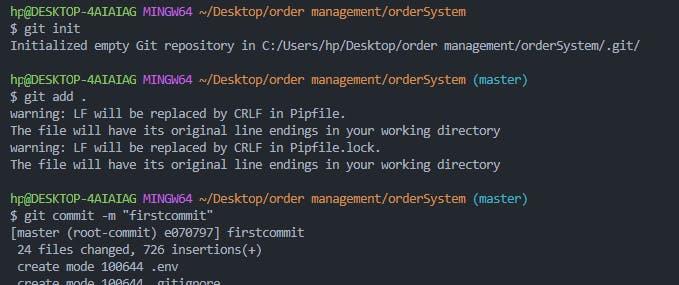
Then, Initialize a GitHub repository and make your first commit.
After, add a local remote for your Heroku app by running the command below

Before deploying our app, we will need to install some dependencies and create a Procfile.
In the terminal, install django_heroku, gunicorn and dj_database_url
$ pipenv install django_heroku

$ pipenv install dj_database_url

$ pipenv install gunicorn
These dependencies are to ensure our app runs well in production.
In the settings.py file, import django_heroku and dj_database_url and add their configuration

Create a file named Procfile in the project directory and add the following:
release: python manage.py makemigrations
release: python manage.py migrate

worker: celery -A orderSystem worker -l info -B

web: gunicorn orderSystem.wsgi --log-file -

#orderSystem is the name of the project folder
The release commands ensure Heroku runs our migrations at every deployment, and the worker is to activate our background task in celery in production.
Before deploying, disable collect static by running the command below and ensure all files have been staged, committed, and pushed to GitHub.

Now, our app is set to deploy, push to Heroku using the command below:
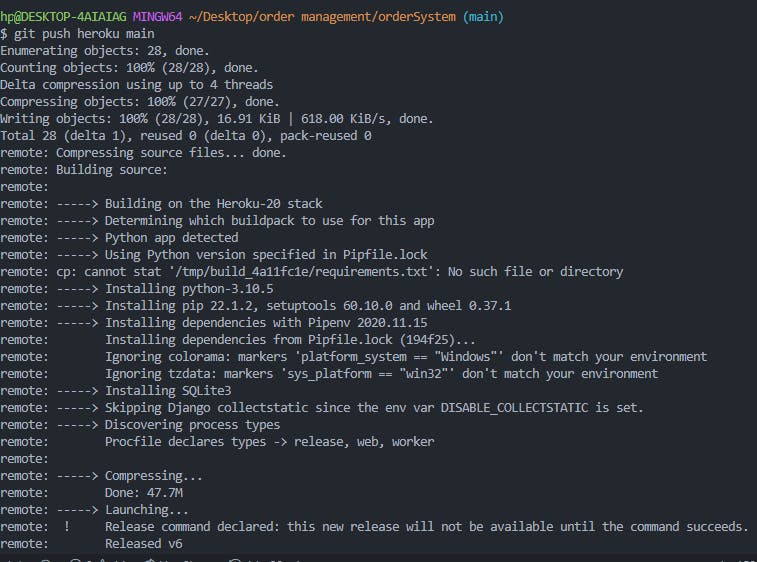
Activating worker process
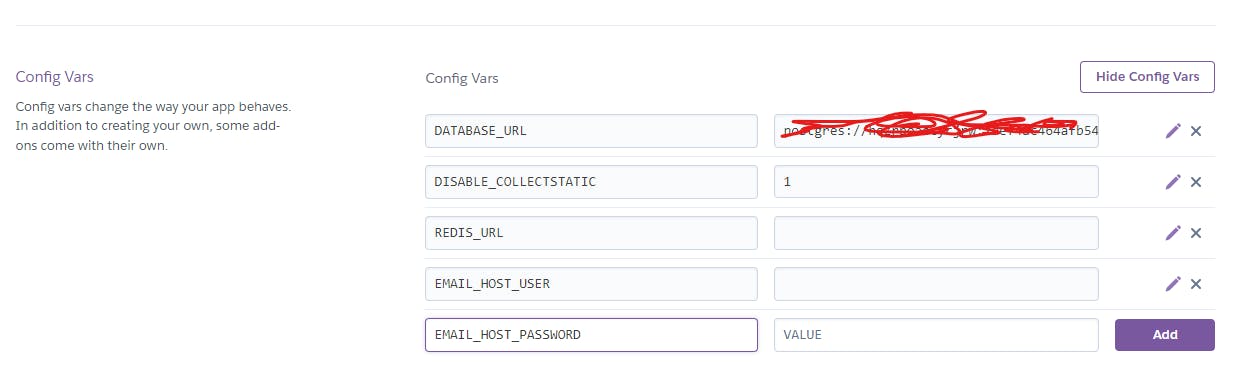
Before testing the API, I will activate the worker process from the terminal and add all my environment variables in config vars on the Heroku dashboard.
On your app dashboard in Heroku, go to settings and navigate to the config vars section to add your environment variables.
Add your Redis Url, your email, and password
Now, let’s activate our worker process, in your terminal run the following command:

To ensure our worker is up and running, let’s run the following command
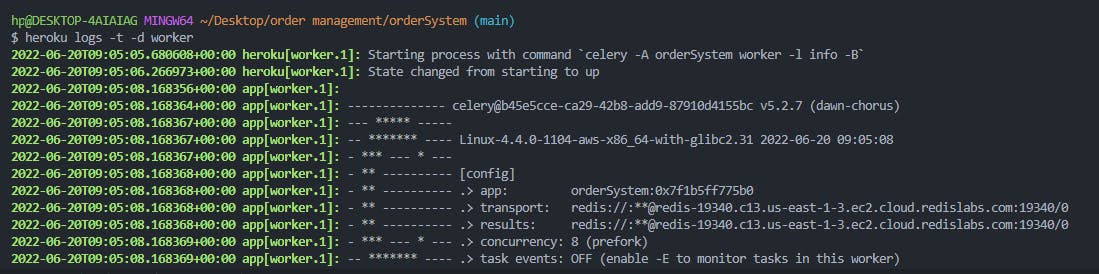
This shows our worker process is up and connected to our Redis instance successfully.
Now, let’s test our API.
Testing the API in production
In postman, I will create a new order
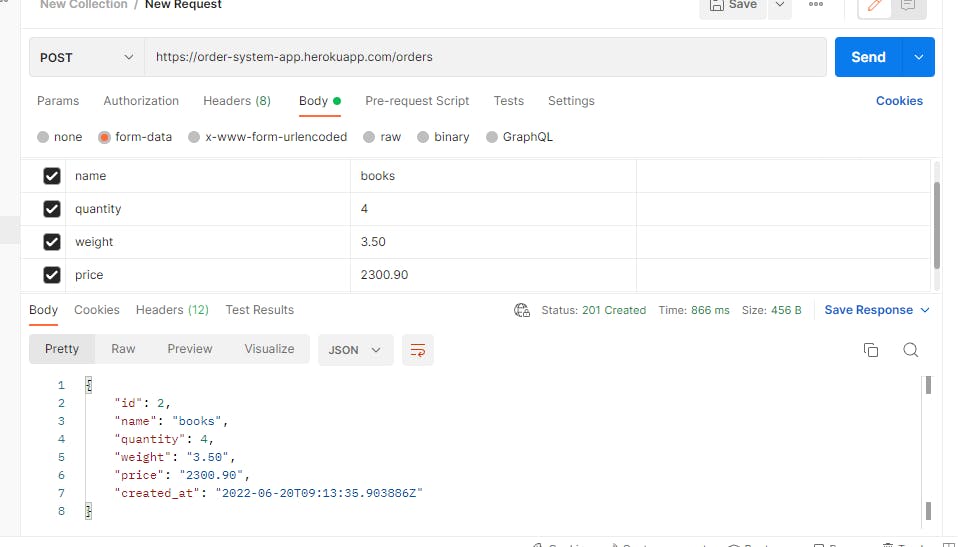
I added the necessary fields and I created a new order successfully in my database, now let’s create a shipment for this order.
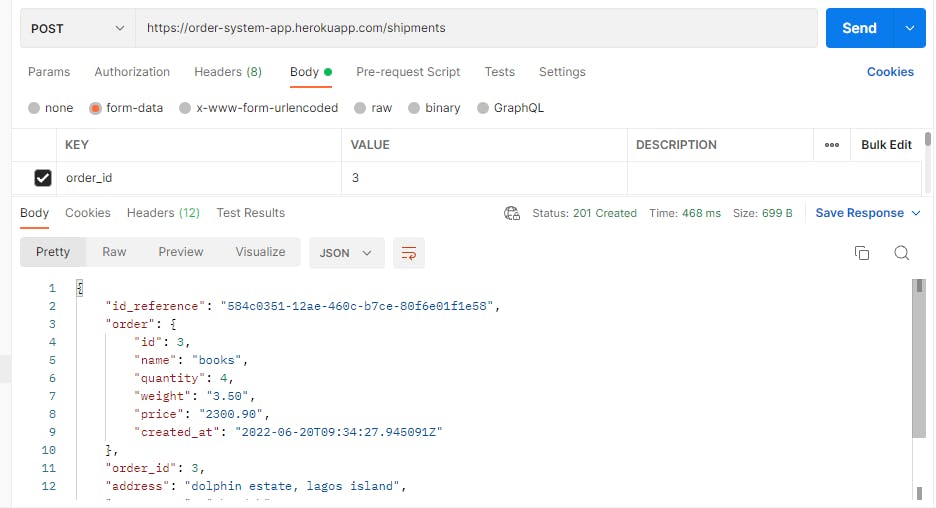
Let me check my email to ensure my background task was handled
My shipment details have been sent!
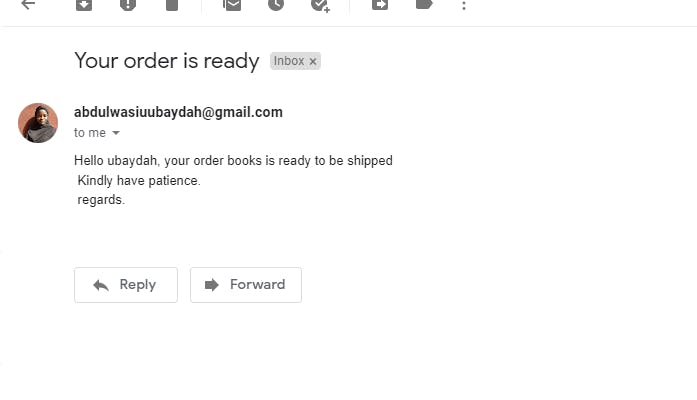
This shows that my background task was handled successfully by Celery and Redis.
Conclusion
In this article, we have learned about Redis, and how to create a Redis instance on the Redis Cloud, demonstrated how to create an API that runs asynchronous tasks using Celery, deployed the API to Heroku, and tested it in production.
All codes can be found in this repository. The API documentation.
This post is in collaboration with Redis.
Reference
Watch this video on the benefits of Redis
Celery's first steps with Django
Thanks for reading.
Kindly share if you find it useful and don't forget to send feedback.