

Introduction
Paystack is a payment gateway that helps individuals and businesses in Africa to accept payments from anywhere in the world. In this tutorial, I will be creating a wallet system API using Django Rest Framework that allows users to deposit funds in a wallet using Paystack as a third-party API for payments.
Prerequisites
You will need the Knowledge of the following to flow well with the tutorial:
- A good understanding of Python
- Knowledge of Django and Django Rest Framework
- Basic knowledge of Postman to test endpoints
- Usage of the Python request library
- A Paystack account
Now, let's dive into the tutorial, all codes can be found on Github in this repository.
Project Setup
Create a Folder and activate a virtual environment in it.
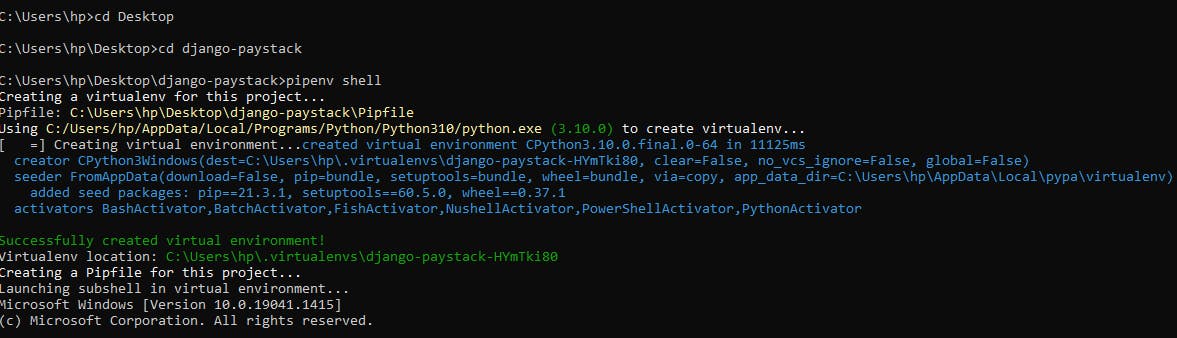
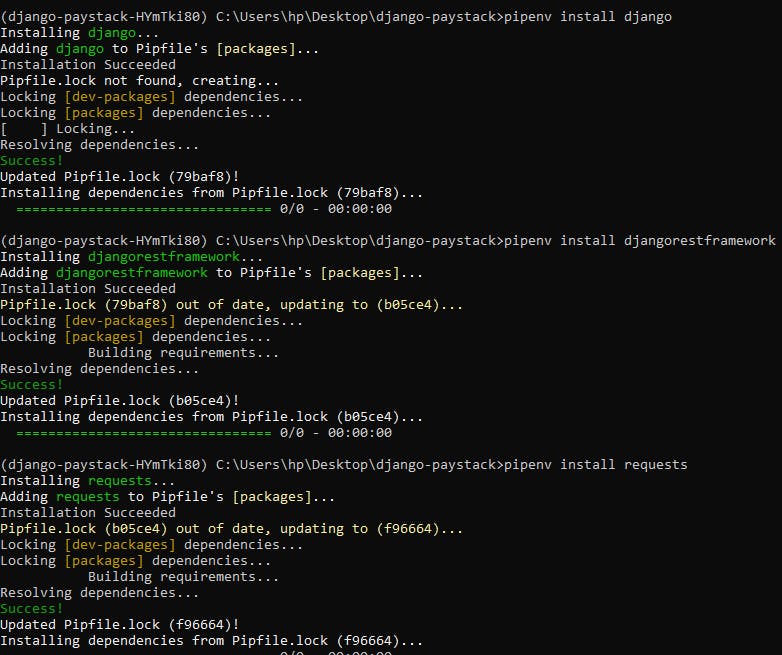
Install Django, Djangorestframework, and the requests library in your environment using pipenv install django, pipenv install djangorestframework and pipenv install requests respectively..
Create a new Django project, go to the project directory and create a new app
$ django-admin startproject wallet

$ cd wallet

$ python manage.py startapp walletApp
Add the installed app and rest_framework in settings.py
INSTALLED_APPS = [
             .......
             'walletApp',
             'rest_framework',
             'rest_framework.authtoken'

]
Ensure the server is up and running by running the command python manage.py runserver
Run all current migrations by running the command python manage.py migrate
Create a urls.py file for the app and include the file in the project urls.py
from django.contrib import admin
from django.urls import path, include

urlpatterns = [
    path('admin/', admin.site.urls),
    path('', include('walletApp.urls')),
]
Then, include the code below in the app's urls.py
from django.urls import path


urlpatterns = [

]
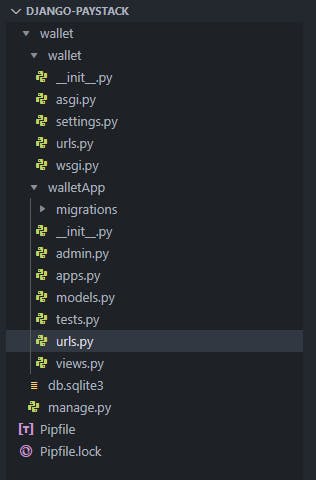
Your project files structure should look like this:
Creating models
We will be creating Wallet and WalletTransaction models to store the user and transactions info.
Add the following codes in your models.py
from django.db import models
from django.contrib.auth.models import User
from django.utils import timezone

# Create your models here.


class Wallet(models.Model):
    user = models.OneToOneField(
        User, null=True, on_delete=models.CASCADE)
    currency = models.CharField(max_length=50, default='NGN')
    created_at = models.DateTimeField(default=timezone.now, null=True)


    def __str__(self):
        return self.user.__str__()

class WalletTransaction(models.Model):

    TRANSACTION_TYPES = (
        ('deposit', 'deposit'),
        ('transfer', 'transfer'),
        ('withdraw', 'withdraw'),
    )
    wallet = models.ForeignKey(Wallet, null=True, on_delete=models.CASCADE)
    transaction_type = models.CharField(
        max_length=200, null=True,  choices=TRANSACTION_TYPES)
    amount = models.DecimalField(max_digits=100, null=True, decimal_places=2)
    timestamp = models.DateTimeField(default=timezone.now, null=True)
    status = models.CharField(max_length=100, default="pending")
    paystack_payment_reference = models.CharField(max_length=100, default='', blank=True)

    def __str__(self):
        return self.wallet.user.__str__()
Note: We are using the default
Usermodel provided by Django.
After the creation of the models run python manage.py makemigrations and python manage.py migrate to migrate the models into the database. Then register the models on the admin page by adding the codes below in the admin.py file.
from django.contrib import admin
from .models import Wallet, WalletTransaction
# Register your models here.

admin.site.register(Wallet)
admin.site.register(WalletTransaction)
Implementing Login and Register Functionality
We will be implementing authentication using the Rest framework Default Token Authentication. We will also be generating auth tokens for each registered user using rest_framework.authtoken.
Add the following to the settings.py file:
REST_FRAMEWORK = {
'DEFAULT_AUTHENTICATION_CLASSES': (
'rest_framework.authentication.SessionAuthentication',
'rest_framework.authentication.TokenAuthentication',
),
    'DEFAULT_PERMISSION_CLASSES': (
    'rest_framework.permissions.IsAuthenticated',
)
}
Create a serializers.py file in the app directory
Add the codes below:
from rest_framework import serializers
from rest_framework.authtoken.models import Token
from django.contrib.auth.models import User


class UserSerializer(serializers.ModelSerializer):
    """
    Serializer to validate and create a new user
    """
    class Meta:
        model = User
        fields = ['id', 'username', 'email', 'password']
        extra_kwargs = {'password': {'write_only': True}}

    def create(self, validated_data):
        user = User(
            username=validated_data['username'],
            email=validated_data['email']
        )
        user.set_password(validated_data['password'])
        user.save()
        Token.objects.create(user=user)
        return user
in views.py, add the codes below for the Login and Register Endpoints
from rest_framework.views import APIView
from rest_framework.response import Response
from rest_framework import status
from django.contrib.auth import authenticate

from .serializers import UserSerializer


class Login(APIView):
    permission_classes = ()

    def post(self, request):
        username = request.data.get("username")
        password = request.data.get("password")
        user = authenticate(username=username, password=password)
        if user:
            return Response({"token": user.auth_token.key, "username": username})
        else:
            return Response({"error": "Wrong Credentials"}, status=status.HTTP_400_BAD_REQUEST)


class Register(APIView):
    authentication_classes = ()
    permission_classes = ()

    def post(self, request):

        serializer = UserSerializer(data=request.data)
        serializer.is_valid(raise_exception=True)
        serializer.save()

        return Response(serializer.data)
Then, create a URL path for the views in the app's urls.py file
from django.urls import path
from .views import Login, Register


urlpatterns = [
    path('register/', Register.as_view()),
    path('login/', Login.as_view()),
]
Run the server and let's use Postman to test the endpoints.
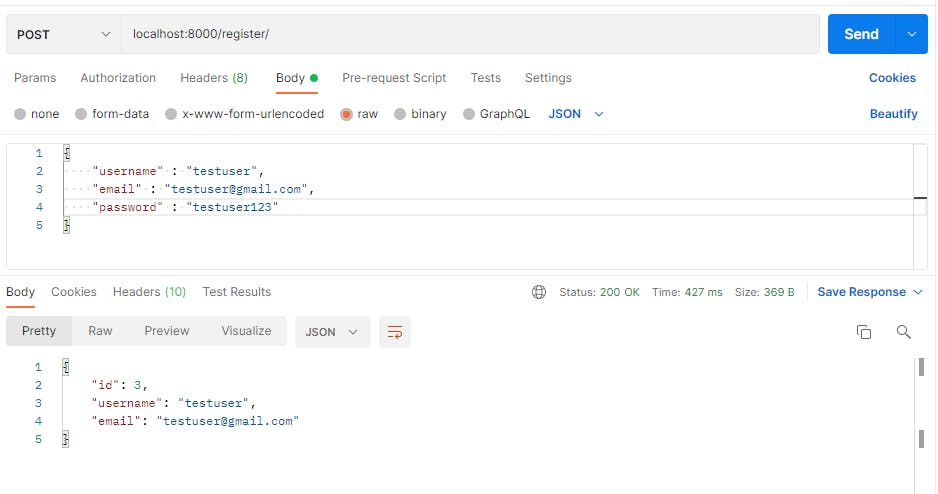
I will be adding a new user running localhost:8000/register/
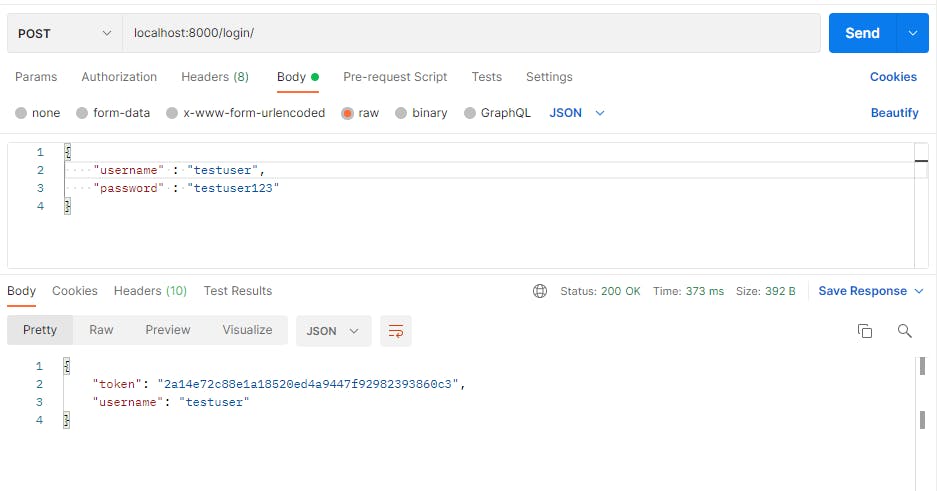
using the newly created user credentials, I will be logging in the user with localhost:8000/login/
Implementing the Deposit Funds endpoint
We will be implementing the deposit endpoint which will allow users to deposit funds using Paystack. A Paystack account is needed and the secret_key can be gotten from Paystack Dashoard.
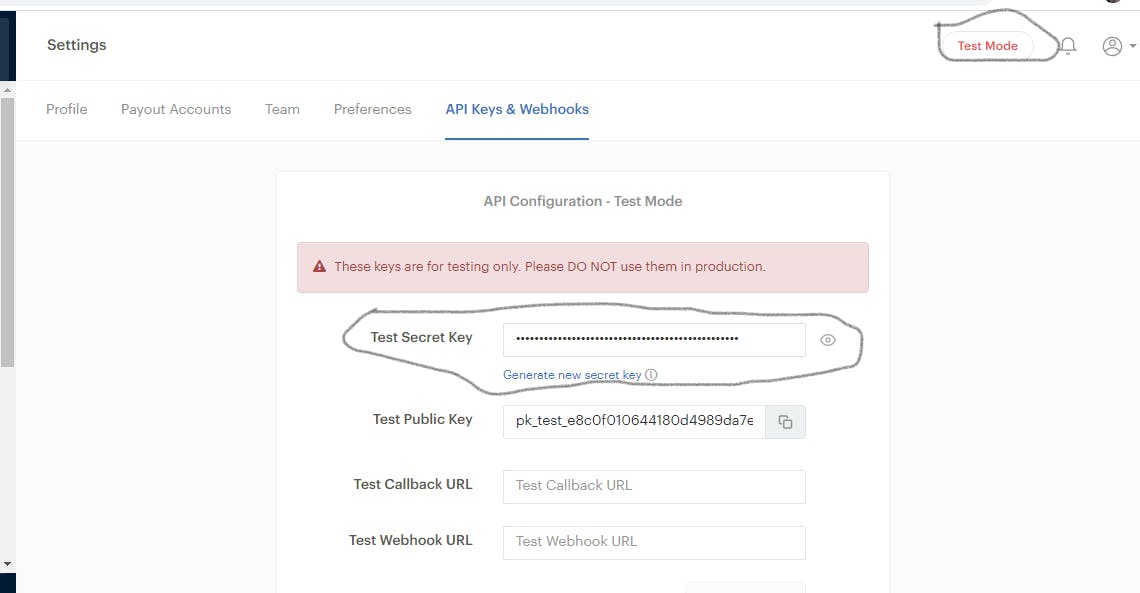
Note: The dashboard is in test mode which means any transactions made will be void.
in serializers.py, add the codes below to validate the user's wallet and the payload entry when depositing funds into the wallet. The get_balance method aggregates all the successful transactions carried out by the user and sums up the amount.
from .models import Wallet, WalletTransaction
from rest_framework import serializers
from django.db.models import Sum
from rest_framework.authtoken.models import Token
from django.contrib.auth.models import User
from django.conf import settings
import requests

class WalletSerializer(serializers.ModelSerializer):
    """
    Serializers to validate the user's wallet
    """
    balance = serializers.SerializerMethodField()

    def get_balance(self, obj):
        bal = WalletTransaction.objects.filter(
            wallet=obj, status="success").aggregate(Sum('amount'))['amount__sum']
        return bal

    class Meta:
        model = Wallet
        fields = ['id', 'currency', 'balance']


def is_amount(value):
    if value <= 0:
        raise serializers.ValidationError({"detail": "Invalid Amount"})
    return value


class DepositSerializer(serializers.Serializer):

    amount = serializers.IntegerField(validators=[is_amount])
    email = serializers.EmailField()

    def validate_email(self, value):
        if User.objects.filter(email=value).exists():
            return value
        raise serializers.ValidationError({"detail": "Email not found"})

    def save(self):
        user = self.context['request'].user
        wallet = Wallet.objects.get(user=user)
        data = self.validated_data
        url = 'https://api.paystack.co/transaction/initialize'
        headers = {
            {"authorization": f"Bearer {settings.PAYSTACK_SECRET_KEY}"}
        r = requests.post(url, headers=headers, data=data)
        response = r.json()
        WalletTransaction.objects.create(
            wallet=wallet,
            transaction_type="deposit",
            amount= data["amount"],
            paystack_payment_reference=response['data']['reference'],
            status="pending",
        )

        return response
I validated the amount and the email in the serializer, you can check out ways to validate data in serializers in this article.
in views.py file, add the following codes for the user's wallet info, deposit funds, and verify deposit endpoints
from rest_framework.views import APIView
from rest_framework.response import Response
from rest_framework.decorators import api_view
from django.conf import settings
from .models import Wallet
from .serializers import WalletSerializer, DepositSerializer

class WalletInfo(APIView):

    def get(self, request):
        wallet = Wallet.objects.get(user=request.user)
        data = WalletSerializer(wallet).data
        return Response(data)


class DepositFunds(APIView):

    def post(self, request):
        serializer = DepositSerializer(
            data=request.data, context={"request": request})
        serializer.is_valid(raise_exception=True)

        resp = serializer.save()
        return Response(resp)

class VerifyDeposit(APIView):

    def get(self, request, reference):
        transaction = WalletTransaction.objects.get(
        paystack_payment_reference=reference, wallet__user=request.user)
        reference = transaction.paystack_payment_reference
        url = 'https://api.paystack.co/transaction/verify/{}'.format(reference)
        headers = {
            {"authorization": f"Bearer {settings.PAYSTACK_SECRET_KEY}"}
        r = requests.get(url, headers=headers)
        resp = r.json()
        if resp['data']['status'] == 'success':
            status = resp['data']['status']
            amount = resp['data']['amount']
            WalletTransaction.objects.filter(paystack_payment_reference=reference).update(status=status,
                                                                                        amount=amount)
            return Response(resp)
        return Response(resp)
The DeposiFund allows the deposit of funds, it takes the amount and the user email as payload while the VerifyDeposit class verifies the deposit whether it is successful before updating the status of the transaction to "success".
let's create a URL path for the views in the app's urls.py file
from django.urls import path
from .views import Login, Register, WalletInfo, DepositFunds

urlpatterns = [
    path('register/', Register.as_view()),
    path('login/', Login.as_view()),
    path('wallet_info/', WalletInfo.as_view()),
    path('deposit/', DepositFunds.as_view()),
    path('deposit/verify/<str:reference>/', verify_deposit),
]
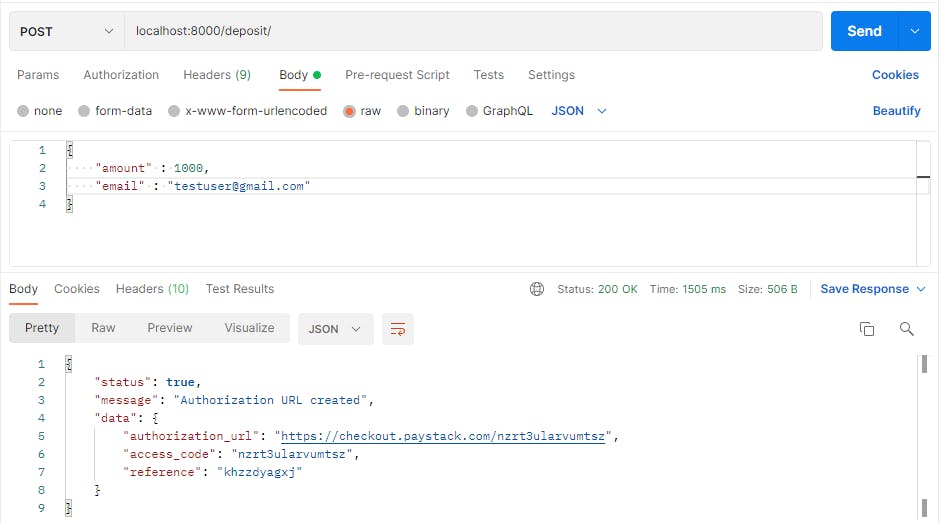
We will be testing the endpoints in Postman for the test user. I will deposit an amount in the user's account.
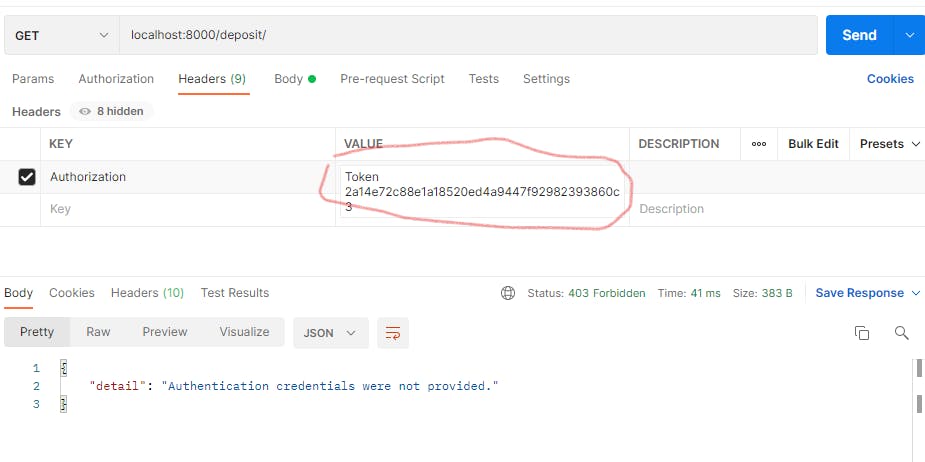
Note: Ensure you add the authorization header above which is the token displayed after logging in to avoid an error.
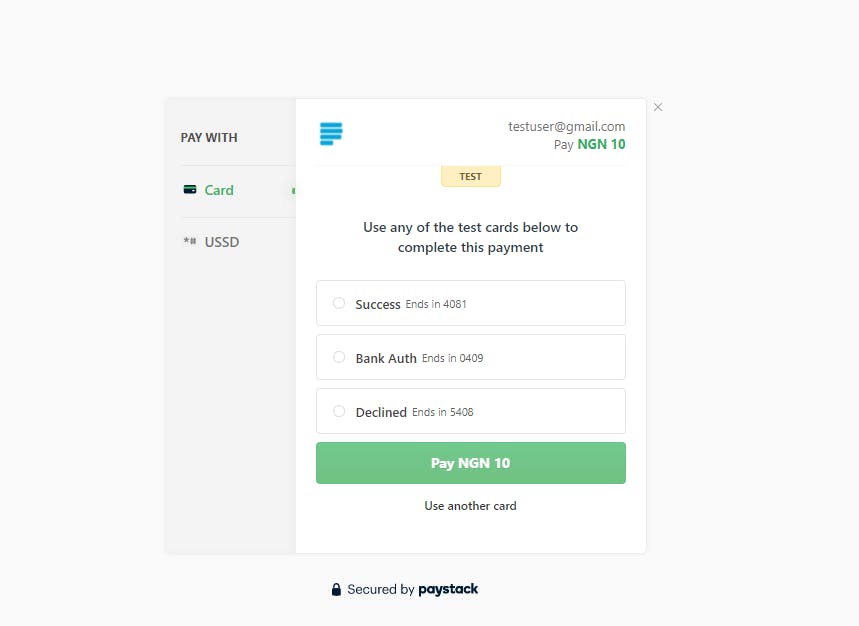
Deposit an amount, you will get the Paystack checkout link in the response, copy the link in your browser and proceed to checkout the payment.
You will see an interface shown below:
Then verify the deposit by copying the reference in the deposit endpoint response and adding it as a parameter in the deposit/verify/<str:reference> endpoint.
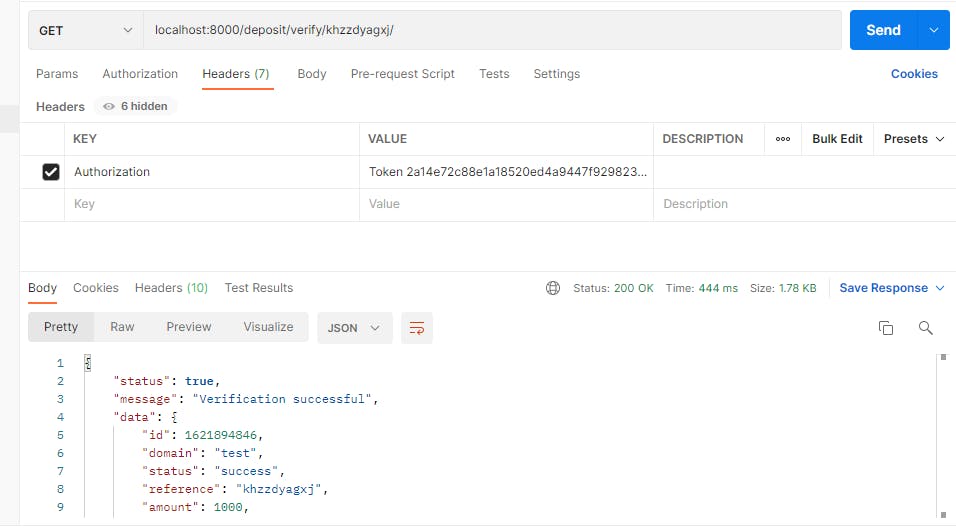
The status shows success which depicts the amount that was deposited successfully, let's check the wallet info for our balance.
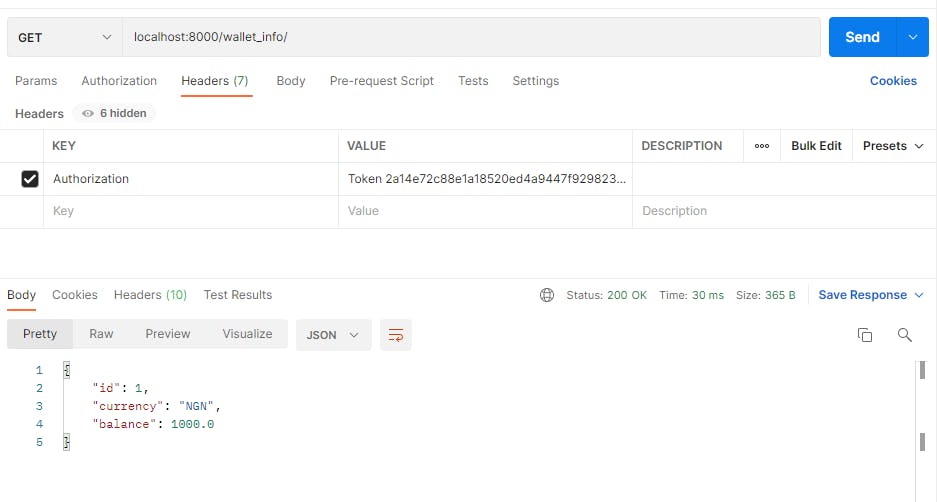
This shows the amount was successfully added to the user's balance.
Note: In production, it is best to use a webhook to receive the response from Paystack before populating the database to a successful transaction instead of the VerifyDeposit endpoint. You can read more on Paystack Webhooks
Conclusion
We have successfully integrated Paystack into our API and deposited an amount successfully.
All codes can be found in this repository
Reference
Connect with me on Linkedin | Twitter | Github
Thanks for reading.